
Wednesday, October 12, 2022
Tuesday, October 4, 2022
Use Epsom Salt in the Veggie Garden

It's Organic and Economical!
Growing healthy, juicy vegetables is as much an art as it is a science. One of the most effective yet economical ways to ensure that you grow great vegetables, whether potted or in the vegetable garden, is to use Epsom Salt.

So what is Epsom Salt and why is it so popular among vegetable gardeners?
The main ingredient in Epsom Salt is magnesium sulfate which is an important soil additive for healthy plant life. It allows plants to take in nutrients like phosphorus and nitrogen and enhances the capability of the soil. It assists in the creation of chlorophyll which is used by the plant to convert sunlight into food.
Generally, the benefits of Epsom Salt on plants are many including that it’s organic, it’s gentle on plants and it’s inexpensive!

Here are some specific ways it helps with your vegetable plants:
- Improves flower blooming.
- It enhances a plant’s green color.
- It helps plants grow bushier.
- Greatly improves a plant’s ability to produce fruit and flowers.
- Assists in seed germination and gives a stronger start to seedlings.
- It’s safe, and there is little danger of problems from overuse.
- It doesn’t build up in the soil and it won't have buildup that will clog the root cells of your plants. In fact, Epsom salt can be used for potted plants that have developed a salt accumulation.
- It's organic!

Versatility in its Use!
Another big advantage of Epsom Salt is its versatility in the way it can be used. You can sprinkle Epsom Salt over a large garden area, you can use it to circle around plants or you can add a solution of Epsom Salt to a garden sprayer.
Here are some specifics.
On a New Vegetable Garden Area
If you're just breaking ground on a new plot for a vegetable garden, just sprinkle up to one cup per 100 square feet and work it into the soil.
To Help with Transplant Shock
Did you know that using Epsom Salt can reduce transplant shock? Plants can become weak and wither right after transplanting, and Epsom Salt can help reduce that transplant shock to the plant roots. The solution to use for this is one cup of Epsom Salt per 100 square feet.

On Potted Vegetables
Epsom Salt can be safely used with all fruits, vegetables, and herbs.
Water an area with a solution of 2 tablespoons of Epsom Salt per gallon of water and apply at least one time a month for more robust fruiting.

For a Large Vegetable Garden
Fill your tank sprayer with one tablespoon of Epsom Salt per gallon of water. Use this mixture to spray your garden after the initial planting, when the plants start growing and when the vegetables begin to mature.


Tomatoes
Since tomatoes are prone to magnesium deficiency, Epsom Salt is a great way to keep the plants healthy later into the season when the leaves of the plant can turn yellow. You may also have noticed a decreased production as the season wanes on.For tomatoes, it is important to use Epsom Salt at the beginning of the season and all through the season. Add one to two tablespoons of Epsom Salt before sowing seeds or planting a transplant. As the tomato plant matures, work in one tablespoon of Epsom Salt per foot of plant height around the base of the plant. An alternative is to create a spray of one tablespoon of Epsom Salt to a gallon of water and spray the plant every two weeks.

Peppers
Peppers, too, can benefit from using Epsom Salt the same way as tomatoes.In Closing
With this many uses for Epsom Salt in the vegetable garden, you're sure to find several uses for it in yours.
~~~~~~~~~~
Where to go next!
Great Garden Articles -- Full List!
Follow us on Pinterest!
Back to Our Blog Homepage!
This post may contain some Amazon Associate links meaning that I will get a small compensation at no expense to you if you purchase something from this blog.
Monday, October 3, 2022
Already Growing your Veggies! Pressure Can Them!

If you're already growing your own food and haven't yet delved into the preserving world of pressure canning and water bath canning, you're really missing out on a great opportunity.
In addition to saving money by preserving your hard-earned harvest, a pantry full of jars of food will give you confidence that your family will stay safely fed through these current uncertain times.
Here is a great list of items you'll need to get you started.

First, to learn the basics of pressure canning, a good book like this one is very important.
There are some essential kitchen appliances that you will need to get started. The cost of some of these items may seem a bit daunting at first, but the investment will be well worth it.
First, you will need a pressure canner. NOT a pressure cooker, but a pressure canner. A pressure canner is used to cook, sterilize, and preserve low-acid foods that are to be canned for future use.
Pressure Canner
Water Bath Canner
You will need a good supply of canning jars, lids, and rings. These three items come together in a case of canning jars.
You cannot use just any jar in canning food. Canning jars are specially designed to withstand the high temperature of steam pressure processing and the low temperature of freezing. These jars will be labeled as canning and/or freezing jars.
Canning Jars
These jars come in a variety of sizes, most commonly found are:
Pints.
Pint jars are great for just about anything you want to add to them for smaller portions.
Quarts.
Quarts are a great family-size jar. They are ideal for canning whole fruits and vegetables like peaches and green beans, or for just for canning larger portions.
Half Pint or Jelly Jars
Half Pints. This small size is great for creating gifts or small batches of jams, jellies, or preserves. Some smaller or cut vegetables may fit in these jars if using a wide-mouth canning jar.

You can sometimes find some canning jars at thrift stores, or maybe you have a relative that no longer does canning and has a stash of jars. If you find some of these older canning jars, you may need to buy lids and rings to go with those jars.
Canning Jar Lids and Rings
There are reusable lids available now that are called “Tattler” lids that are made in the USA. They also come in sizes suitable for both wide mouth and regular mouth jar sizes. You can use these with pressure canners, water bath canners, and vacuum sealers.
There are reusable lids available now that are called “Tattler” lids that are made in the USA. They also come in sizes suitable for both wide mouth and regular mouth jar sizes. You can use these with pressure canners, water bath canners, and vacuum sealers.
Tattler Lids
There are also plastic lids for canning jars for use in storing the jars in the fridge after they've been unsealed.
Plastic lids that fit canning jars

You will need various kitchen utensils to make your canning projects easier. You can buy a kit of items like the one below that has most if not all of the items you will need.
Utensil Kit
Or you can purchase items separately. You will need:
Funnel that fits jar openings
Ladels
Jar Lifter

Other supplies you may need, depending on the types of food that you intend to can, are:
Pickle Crisp (for pickling veggies and pickles)
Citric Acid, commonly used for home canning tomatoes
Canning Salt (Not regular salt)
Real Fruit Pectin for homemade Jam and Jelly recipes.
5% Vinegar You will probably use large amounts of this. Vinegar is used in the pressure canner to prevent minerals from hard water from building up on the jars or on the inside of your canner. Vinegar is also used along with water to fill jars of some foods to be processed.
5% Vinegar
There are also seasoning packets available for use in canning like salsa tomato mixes, pickle mixes, potato seasonings, etc. Mrs. Wagers' brand is very popular with canners.
Mrs. Wagers' Packets

So what are you waiting for? Learn to pressure can and water bath can and start saving money on food and getting some much-needed food security!
Back to Blogger Home
Try Amazon Home Services
This post may contain Amazon affiliate links and as an Amazon Associate I earn from qualifying purchases without costing you anything extra.
Try Amazon Home Services
Common Reasons for Winter Sowing Failures
Winter Sowing Failures and Reasons
Winter sowing has become one of my favorite ways to grow plants. It's also becoming more and more popular because it's easy and it works!
But, if you’ve read the Winter Sowing 101 guide and tried the winter sowing method but had some failures, the reasons for your lackluster results are probably listed below, along with ways to help ensure future success.
But, if you’ve read the Winter Sowing 101 guide and tried the winter sowing method but had some failures, the reasons for your lackluster results are probably listed below, along with ways to help ensure future success.
If you had very little or no germination at all, it could be as simple as old seeds.
 |
| Click to View |
A Little Bit About Traded Seeds
For years I tried to save money by trading seeds on the internet and locally. Trading seeds will save you money, but you really don’t know that those seeds are actually the type of seed marked on the packet, how old the seeds are or how the package of seeds has been stored.
If you’re growing flowers from seed, having a germination failure from old or traded seeds is not a really big issue as you probably have time to reseed. But if you’re trying to grow a food crop from bad/old seed, you could lose an entire growing season of that crop by the time you realize there's a problem.
I recommend that you spend the money and buy your food crop seeds from a reputable seed supplier. There are several big names that will pop up on an internet search.
 |
| Click to View |
A Bit about Sow Times
There’s really only a few things to remember about when to sow the seeds and put them outside in their winter sowing containers.
Seeds of annual warm-season plants are generally sown four weeks before your average last frost date. Sowing them a lot earlier increases your odds of the seeds sitting in the containers longer than they need to and rotting from excessive moisture.
Some seeds, like most hardy perennials and cold weather crops, need a period of cold stratification, and that's why these seeds are sown and placed outside a few months earlier than the others. This "cold stratification" helps the seeds to slowly break dormancy and initiate the germination process when the weather is right.
Conditions Aren't Right For Germination Yet
It's important to remember that different seeds of plant types will germinate at different times as the seeds are waiting for the right conditions.
For instance, seeds of cold hardy plants need the cooler temperatures and will generally germinate before seeds of warm weather plants.
If the seeds haven't germinated when you expected, it may just be a case of waiting a few weeks longer for the seed to get the right conditions to germinate. Don't give up too soon. Many winter sowers, including myself, have chucked a winter sown container only to find out that the seeds did germinate later.
 |
| Click to View |
Seedlings Germinated then Died
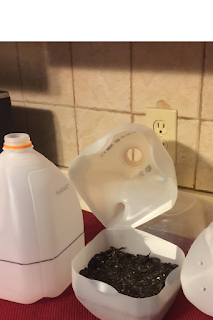
Excess water not only can rot the seeds as they wait to germinate, but can kill seedlings once they’re up. Having an adequate amount of drainage holes in the bottom of the winter sown container is very important.
For a milk jug container, I put at least five to six drainage holes in the bottom. If you’re using a knife to cut slits for drainage, I would double that. More is better.
For a milk jug container, I put at least five to six drainage holes in the bottom. If you’re using a knife to cut slits for drainage, I would double that. More is better.
If the containers were placed for the winter in an area where excessive rainfall has fallen on them, like under house eves, (I've done that), that extra rain could rot what's inside.
Also, if the containers were placed directly on soil, the soil underneath may have eventually clogged the drainage holes. I place my winter sown containers on top of a graveled area for extra drainage.
Late Frosts
If there's a late frost after the seedlings are up,
throw a blanket or like item over the containers and take it off in the morning. Winter sown seedlings are relatively hardy since they are already somewhat acclimated to the outside weather, however, they are still only seedlings, and big swings in temperature will necessitate the extra care.
 |
| Click to View |
Excess Heat
The same winter sown enclosures that keep the soil and seedlings warmer in cold weather will also allow the containers to keep in the sun's warmth, and an unusually hot, sunny day can literally fry young seedlings.
Placing the containers facing south will give the containers a bit of an edge against really harsh winters. Once the weather begins to warm and the sun becomes stronger, moving the containers to an area with less direct sun is recommended.
Soil Dried Out
The lids of the containers are left off for the sole purpose of letting moisture in during the winter or colder weather. But once the seedlings are up and the weather warms and rainfall decreases, it’s necessary to check on the soil every few days just to make sure it hasn’t completely dried out. A good spritz of water on the top of the soil may be enough.
In drier conditions you may need to water the soil well, and bottom watering the containers is the best way to do that. Just set the containers in a tub of a few inches of water, maybe a kids' pool, and let the soil drink up what it needs. Make sure you take the containers out once the soil is saturated.
 |
| Click to View |
Lack of Nutrition
Spring is a very busy time in the garden, and sometimes my winter sown seedlings or plants don't get planted as early as I would like.
If you notice that some leaves on the seedlings are yellowing, a shot of diluted balanced fertilizer at 1/4 strength can give them the shot they need to remain healthy. This is even more important if you had used a soil mix in the containers that did not contain any fertilizer.
I use a regular potting soil that contains a small amount of fertilizer, and that is usually enough to sustain the seedlings until transplant.
 |
| Click toView |
Seedlings Die After Transplanting
Even though winter sown seedlings are already much hardier than those grown inside under grow lights which need to be hardened off, they will still need more care until they are well established in their final destination.
Further Reading: How to Harden Off Seedlings
If in doubt that the seedlings are strong enough to transplant out into the garden, let them grow in the container a bit longer. And when you do transplant the seedlings, shade them for a few days with a tented piece of cardboard or the like as you would with any transplant.
If you have more seedlings than you really need and they've grown together in a hunk, instead of disturbing the roots and planting them separately, you can transplant a hunk of seedlings together and let the hardiest survive.
~~~~~~~~~~~~~~~~~~~~~~~~~~~~~~~~~~~
So there’s my top reasons for why you may have gotten less than stellar results from your winter sowing attempt.
Great Garden Articles -- Full List!
If in doubt that the seedlings are strong enough to transplant out into the garden, let them grow in the container a bit longer. And when you do transplant the seedlings, shade them for a few days with a tented piece of cardboard or the like as you would with any transplant.
Transplanting Tip
If you have more seedlings than you really need and they've grown together in a hunk, instead of disturbing the roots and planting them separately, you can transplant a hunk of seedlings together and let the hardiest survive.
~~~~~~~~~~~~~~~~~~~~~~~~~~~~~~~~~~~
So there’s my top reasons for why you may have gotten less than stellar results from your winter sowing attempt.
Paying extra attention to those pitfalls at the critical stage of germination and early growth can ensure you future success.
And once that success comes, you'll want to winter sow every year!
~~~~~~~~~~~~~~~~~~~~~~~~~~~~~~~~~~~~~~~~
Where to go next!
Great Garden Articles -- Full List!
Follow us on Pinterest!
Hit the "Follow Button" Our Blog Homepage!
This post may contain some Amazon Associate links meaning that I will get a small compensation at no expense to you if you purchase something from this blog.
Sunday, October 2, 2022
Ten Steps For Vegetable Garden Success

Ten Steps to Veggie Garden Success
Successful gardening doesn't come by accident, and in my opinion, there is NO SUCH THING as a green thumb. Success comes from good pre-planning and thoughtful follow-through. It's knowing what each vegetable plant needs to grow to a successful harvest and giving each plant what it needs.
Wednesday, September 7, 2022
15 Garden Chores for Early Spring

Early Spring Garden Chores
Although the term “early spring” for me in Zone 6 Ohio may not be the same time as the “early spring” for your garden zone, for this article, early spring means that time of year when winter seems to be coming to an end and intermittent freezes and thaws are happening in the garden. The first signs of Spring!
Wednesday, August 17, 2022
Epsom Salt for Roses and Bloomers!

Epsom Salt for Rose and Bloomers
You may have heard that Epsom Salt is a great, safe, effective and economical garden amendment for use on your flowering plants. But what is Epsom Salt and why is it so popular among rose gardeners?
Subscribe to:
Posts (Atom)
Popular Posts
-
 Use of Epsom Salt on Hostas! Hostas continue to be one of the most popular perennials in shady and party shady gardens. It's n...
 -
 Fertilizing Your Hosta Plants It's no surprise that hostas continue to be one of the most popular perennial plants in a variety ...
 -
 What are Sun Tolerant Hostas? One of the most common questions I hear about hostas is, can hostas handle sun?
 -
 When and How to Divide your Hosta Whether you want to divide your hostas for the healthy of the plants or to increase the hosta love...
 -
 Winter Sown Seeds Have Germinated! Now what? So you’ve tried the winter sowing method and found out that it’s easy and it works....
 -
 Best Care for Your Potted Hostas To keep your hostas healthy and beautiful as they grow in pots, there are a few Hosta plants are beau...
 -
 Seasonal Calendar of Care for Hostas One of the reasons that hostas continue to be so popular is the fact that they're a very low m...