Winter Sowing Failures and Reasons
Winter sowing has become one of my favorite ways to grow plants. It's also becoming more and more popular because it's easy and it works!
But, if you’ve read the Winter Sowing 101 guide and tried the winter sowing method but had some failures, the reasons for your lackluster results are probably listed below, along with ways to help ensure future success.
But, if you’ve read the Winter Sowing 101 guide and tried the winter sowing method but had some failures, the reasons for your lackluster results are probably listed below, along with ways to help ensure future success.
Further Reading: Winter Sowing 101
A common reason is bad seeds. Simple enough, right?If you had very little or no germination at all, it could be as simple as old seeds.
A Little Bit About Traded Seeds
For years I tried to save money by trading seeds on the internet and locally. Trading seeds will save you money, but you really don’t know that those seeds are actually the type of seed marked on the packet, how old the seeds are or how the package of seeds has been stored.
If you’re growing flowers from seed, having a germination failure from old or traded seeds is not a really big issue as you probably have time to reseed. But if you’re trying to grow a food crop from bad/old seed, you could lose an entire growing season of that crop by the time you realize there's a problem.
I recommend that you spend the money and buy your food crop seeds from a reputable seed supplier. There are several big names that will pop up on an internet search.
A Bit about Sow Times
There’s really only a few things to remember about when to sow the seeds and put them outside in their winter sowing containers.
Seeds of annual warm-season plants are generally sown four weeks before your average last frost date. Sowing them a lot earlier increases your odds of the seeds sitting in the containers longer than they need to and rotting from excessive moisture.
Some seeds, like most hardy perennials and cold weather crops, need a period of cold stratification, and that's why these seeds are sown and placed outside a few months earlier than the others. This "cold stratification" helps the seeds to slowly break dormancy and initiate the germination process when the weather is right.
Conditions Aren't Right For Germination Yet
It's important to remember that different seeds of plant types will germinate at different times as the seeds are waiting for the right conditions.
For instance, seeds of cold hardy plants need the cooler temperatures and will generally germinate before seeds of warm weather plants.
If the seeds haven't germinated when you expected, it may just be a case of waiting a few weeks longer for the seed to get the right conditions to germinate. Don't give up too soon. Many winter sowers, including myself, have chucked a winter sown container only to find out that the seeds did germinate later.
Seedlings Germinated then Died
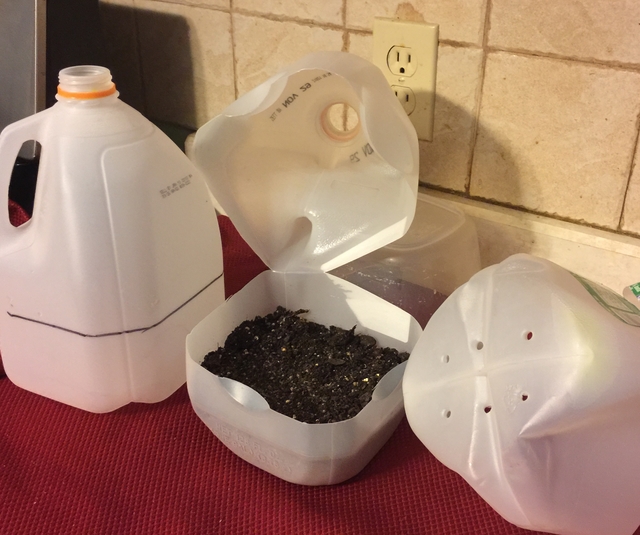
Excess water not only can rot the seeds as they wait to germinate, but can kill seedlings once they’re up. Having an adequate amount of drainage holes in the bottom of the winter sown container is very important.
For a milk jug container, I put at least five to six drainage holes in the bottom. If you’re using a knife to cut slits for drainage, I would double that. More is better.
For a milk jug container, I put at least five to six drainage holes in the bottom. If you’re using a knife to cut slits for drainage, I would double that. More is better.
If the containers were placed for the winter in an area where excessive rainfall has fallen on them, like under house eves, (I've done that), that extra rain could rot what's inside.
Also, if the containers were placed directly on soil, the soil underneath may have eventually clogged the drainage holes. I place my winter sown containers on top of a graveled area for extra drainage.
Late Frosts
If there's a late frost after the seedlings are up,
throw a blanket or like item over the containers and take it off in the morning. Winter sown seedlings are relatively hardy since they are already somewhat acclimated to the outside weather, however, they are still only seedlings, and big swings in temperature will necessitate the extra care.
Excess Heat
The same winter sown enclosures that keep the soil and seedlings warmer in cold weather will also allow the containers to keep in the sun's warmth, and an unusually hot, sunny day can literally fry young seedlings.
Placing the containers facing south will give the containers a bit of an edge against really harsh winters. Once the weather begins to warm and the sun becomes stronger, moving the containers to an area with less direct sun is recommended.
Soil Dried Out
The lids of the containers are left off for the sole purpose of letting moisture in during the winter or colder weather. But once the seedlings are up and the weather warms and rainfall decreases, it’s necessary to check on the soil every few days just to make sure it hasn’t completely dried out. A good spritz of water on the top of the soil may be enough.
In drier conditions you may need to water the soil well, and bottom watering the containers is the best way to do that. Just set the containers in a tub of a few inches of water, maybe a kids' pool, and let the soil drink up what it needs. Make sure you take the containers out once the soil is saturated.
Lack of Nutrition
Spring is a very busy time in the garden, and sometimes my winter sown seedlings or plants don't get planted as early as I would like.
If you notice that some leaves on the seedlings are yellowing, a shot of diluted balanced fertilizer at 1/4 strength can give them the shot they need to remain healthy. This is even more important if you had used a soil mix in the containers that did not contain any fertilizer.
I use a regular potting soil that contains a small amount of fertilizer, and that is usually enough to sustain the seedlings until transplant.
Seedlings Die After Transplanting
Even though winter sown seedlings are already much hardier than those grown inside under grow lights which need to be hardened off, they will still need more care until they are well established in their final destination.
Further Reading: How to Harden Off Seedlings
If in doubt that the seedlings are strong enough to transplant out into the garden, let them grow in the container a bit longer. And when you do transplant the seedlings, shade them for a few days with a tented piece of cardboard or the like as you would with any transplant.
If you have more seedlings than you really need and they've grown together in a hunk, instead of disturbing the roots and planting them separately, you can transplant a hunk of seedlings together and let the hardiest survive.
~~~~~~~~~~~~~~~~~~~~~~~~~~~~~~~~~~~
So there’s my top reasons for why you may have gotten less than stellar results from your winter sowing attempt.
If in doubt that the seedlings are strong enough to transplant out into the garden, let them grow in the container a bit longer. And when you do transplant the seedlings, shade them for a few days with a tented piece of cardboard or the like as you would with any transplant.
Transplanting Tip
If you have more seedlings than you really need and they've grown together in a hunk, instead of disturbing the roots and planting them separately, you can transplant a hunk of seedlings together and let the hardiest survive.
~~~~~~~~~~~~~~~~~~~~~~~~~~~~~~~~~~~
So there’s my top reasons for why you may have gotten less than stellar results from your winter sowing attempt.
Paying extra attention to those pitfalls at the critical stage of germination and early growth can ensure you future success.
And once that success comes, you'll want to winter sow every year!
~~~~~~~~~~~~~~~~~~~~~~~~~~~~~~~~~~~~~~~~
Other Related Articles
Winter Sowing. What to do after Sprouting
Winter Sowing - Common Failures and How to Avoid Them


