Hypertufa 101 - Detailed How-To
Once you know the basics of making hypertufa projects, you will only be limited by your own creativity! It's easy, it's fun, and you can look like an expert even on your first project!
It is recommended that you read through the entire article before beginning your first Hypertufa project. A good basic understanding of the entire process will help ensure first-time success.

What is Hypertufa?
Hypertufa is a light-weight substitute for heavy concrete or cement projects.
When certain ingredients are mixed together and bonded with Portland Cement, the mixture can be molded into nearly any shape or size. The final result is a natural, rock-like garden project that is much lighter than concrete. Creating garden art with Hypertufa is just like making mud pies -- for adults!


Advantages of Using Hypertufa
- Hypertufa pots are lightweight - easier to move than heavy cement.
- It can safely remain outside.
- It's porous which is great for plants.
- It's fun and easy to make.
- You can look like a pro on your first project!
Hypertufa face made with shoebox mold
What can I make with Hypertufa Ingredients?
The short answer is, if you can shape it, you can make it. Some of the garden accessories you can make with Hypertufa recipes include faces, birdbaths, millstones, toadstools, troughs, leaf castings, grogs, garden spheres, and stepping stones.
Garden planters are the most popular items to make so this tutorial will focus on creating garden planters, but the process is basically the same for other projects.
The Three Main Ingredients
1. Portland Cement (NOT Concrete)
Here's why using Portland Cement as the bonding agent in your recipe is so important.
Concrete (Like Quikrete Concrete) is a mixture of cement and sand and fillers. If you use this in place of Portland Cement in the following recipes, you are basically doubling the amount of sand and fillers and lessening the much-needed cement to bond the project together strongly. The result would be a project that will be much heavier and not as strong.
Portland Cement, on the other hand, is NOT concrete. It's an ingredient OF concrete and is the binder.
There is sometimes confusion because Quikrete also makes Portland Cement. You want the bag to clearly state "Portland Cement."
It's available in white and grey. I find grey to be a more natural choice to use for garden projects. White Portland Cement is recommended if you intend to paint the project as it takes on dyes and stains well.
Portland Cement mostly comes in 90-pound bags, but the cost isn't bad at $15 to $18.
2. Peat Moss (or Coir - coconut fiber)
Peat Moss is one of the ingredients that make the final mix lighter in weight than concrete as well as making the final project porous. Big squares of Peat Moss are available at most home goods stores for about $14.
 |
| Click to View |

3. Perlite or Vermiculite
Both are added to further lighten and aerate the mix.
Perlite is the white styrofoam-looking pieces contained in most potting soils. Perlite is more expensive than Vermiculite at $37 for a 4 cubic foot bag.
Vermiculite has a sparkly appearance that gives the project a little bit of a shine and will make the project look more natural in an outdoor setting. Larger bags of Vermiculite can be purchased at local garden stores or swimming pool supply stores for about $22 for a 4 cubic-foot bag.
DIY Hypertufa Recipes
There is a multitude of hypertufa recipes on the internet that you can try. Whatever recipe you choose, remember that the Portland Cement is the necessary bonding agent. I use at least 30% Portland Cement in all of my recipes.
These are my two basic go-to recipes.
For small to medium-sized projects (i.e. garden planters under 12")
1 part Portland Cement
1 part Peat Moss
1 part Perlite or Vermiculite
For larger projects and ones that I feel will need extra strength (stepping stones, for example), here's a stronger recipe.
2 parts Portland Cement
1 part Peat Moss
1 part Vermiculite
1 part Sand (added strength, but also added weight)
Useful Tip
A handful of either nylon fiber mesh or acrylic fibers add strength to the piece.


Setting up your workspace
The best place to work on your hypertufa project is, of course, outdoors as long as the temperatures are above 60 degrees. Hypertufa is messy to work with and you don't want to breathe the ingredient dust that will be stirred up while you're mixing your ingredients. An area in part shade part sun with protection from rain and where you won't need to move it for a week is perfect.
September and October are my go-to months as most of my garden chores are finished for the season and I find that the cool air is wonderful to work in.
Choosing a Hypertufa Mold
A fun part of Hypertufa projects for me is selecting the molds to work with. Any firm object can be used as a mold, including plastic bowls or cups, old nursery pots, baking rounds, wicker baskets or designs, sturdy shoe boxes, large cookie cutters, plastic tubs, boxes (reinforced with tape), styrofoam coolers. The possibilities are endless!
Materials to Have Ready
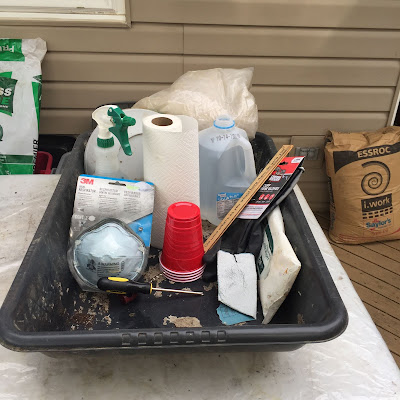
You don't want your mix to dry out while you're hunting for supplies, so have these items ready to hand before you start to mix.
- Old clothes to work in
- Plastic for the work table
- Recipe ingredients
- Large, sturdy mixing container
- Spray bottle of water for spritzing
- Jug of clean water
- Your choice of an item to measure ingredient parts
- Your chosen mold
- Dust mask
- Thick, plastic kitchen gloves (the flimsy ones break!)
- Paper Towels for cleanup
- Plastic to cover tabletop
- Plastic to drape over the finished project
- Small ruler for measuring the thickness
- Sturdy sticks for making drainage holes
- Wire brush for smoothing jagged edges
 |
| Click to View |
Making Your Own Hypertufa Mix
Put on your dust mask and rubber gloves. According to the recipe you've chosen, add the number of parts of each DRY ingredient into the mixing container. If there are any clumps in any of the ingredients, break them down or toss them out as you mix.
You can use any object to measure your "parts." I use red Solo cups that everyone is familiar with.
Materials Before Dry Mixing
DRY MIX THOROUGHLY. Do not add water until the dry ingredients are mixed to the point that you cannot distinguish one ingredient from another. Dry mixing before you add the water will ensure that there won't be any weak spots in the project that could break later.
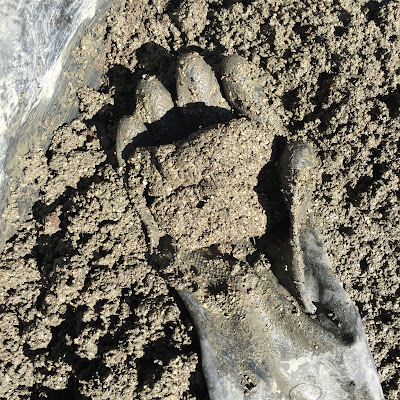
After the ingredients are thoroughly dry mixed, add water slowly and mix until your mix is the consistency, when fisted and released, of a large meatball. If the mix is too dry and falls apart when the fist is released, add more water slowly. If it's too wet and water drips when you fist, add more mix, again slowly. The mix should hold together but not drip when fisted.
This is an important but not an exact step. As long as you can make large Hypertufa meatballs that don't fall apart upon release, you're good to start building!
 |
Click to View  |
You can remove your mask at this time if you choose to. There aren't near as many dust-ups when the mix is not dry. Keep the gloves on, though.
A side note
Some people swear by spraying their mold with a non-stick spray so the finished piece can easily slide out. I find that the spray makes the mix slide around too much while I'm building, and since I use objects that I intend to throw away after using, I never use any spray or oil. Your choice.
 |
Same Sized Bowls Used for Inside, Outside and Flaired Building |
Building a Hypertufa Project
Set your mold on the table giving yourself plenty of elbow room on all sides. If you're going to be doing several projects (I never do just one!) consider this when setting up your table.
There are two ways to use your mold. Building on the inside and building on the outside.
Building on the Inside of the Mold
The only disadvantage in building your mold on the inside is that you are restricted to building a project of that same size and shape, whereas you will have more options building on the outside of the mold.
 |
Building Inside the Mold
This project took 3 parts each of Portland Cement, Peat Moss and Vermiculite |
Building a Hypertufa Project
Shape a fistful of ingredients into that large meatball shape. Starting at the bottom, firmly press your fistfuls of mix into the bottom and bottom corners. You want to keep the thickness of the mix at 1 to 1 and 1/2" thick at all parts of the planter to prevent breakage. I personally prefer the look of 1 and 1/2" thickness.
Continue building up along the sides of the mold until you reach the top. It's better to smooth out the top edges now rather than to let the project dry and have to use a wire brush and a lot of elbow grease later.
If at any point you run low on Hypertufa mix, make more the same way and continue on. If the project ever looks like it's beginning to dry out in places, lightly spray with water. You don't want the project to start to dry out until it's finished and wrapped.
When you're finished building inside the mold, stand back and double-check the thickness, especially at the corners, bottom and top edges. Make sure the bottom is level. If you're making a planter, shove some sturdy sticks through the bottom for drainage holes.
When you're satisfied with the finished project, wrap the project with a piece of plastic and go to the curing page of this article for the next instructions.
 |
Building Outside the Mold
This project took 4 parts each of Portland Cement, Peat Moss and Vermiculite |
Building on the Outside of your Mold
Place the mold upside down on your table. Following the same steps, start building the mix from the top (which will be the bottom of the planter) and build downwards.
When you get to the bottom where the project meets the table, you have the choice to stop there and shape the edges, or further flair out the edges as much as you want. Flaring the edges is simply a matter of extending the mix further onto the table as shown in the furthest right project above.
 |
Building Outside the Mold and Extended or Flaired Further
This project took 8 parts each of Portland Cement, Peat Moss and Vermiculite |
Don't take too much time trying to make the flared edges perfect. The most beautiful Hypertufa projects mock nature, and nature is more haphazard than precise and symmetrical.
 |
| Hypertufa with Bottom Edges Flaired |
When you're satisfied with the project, wrap the project in plastic.
If you have extra mix left over -- It's a lot like biscuits and gravy - it never evens out. Use the extra mix for a small bowl planter. They're great for planting a single sedum or mini hosta!
The Clean Up
Important: You are dealing with a cement-like mix so don't let any mix, even very watery, go down the drain! It will clog your pipes. For the same reason, don't put any Hypertufa stained clothing in the washer. The extra mix can be easily scraped into a plastic bag and discarded.
Curing your Hypertufa Project
This is an important step! You don't want your hard work to break before it has cured.
There are many opinions about the "correct" way to cure hypertufa planters. The general consensus is that your project will do most of its curing in the first seven days, reaching a full cure in a month.
Factors that come into play here are the temperature and humidity of the area where it's curing and the size and thickness of the project.
This is the three-stage process that I have used successfully.
Step One
You have finished the planter and wrapped it in plastic to hold in the moisture that will help the project dry evenly and slowly which will make it stronger. Leave in place for 24 hours.
Step Two
After 24 hours, remove the plastic. This is a great time to do any carving into the planter, sanding of rough edges, etc. It is still pliable enough to work with to get it just the way you want. A little dusting of the medium may come off when you work with it, but that's fine. Rewrap when satisfied.
The final cure can last anywhere from two weeks to a month or longer. Check the project weekly and lightly spritz it with water until you feel it is cured or a month has passed.
Step Three
Since this example is for planters and Portland Cement has high alkaline levels, leaching the planter before putting plants in it is important for good plant health.
Soak the planter in fresh water changing the water every three days. Simple enough.
For large planters, you can hose the planter down twice a day for three to five days.
I mostly make my hypertufa planters in the Fall and don't plan to plant them until the next spring, so I simply leave them outdoors for nature to naturally leach them from the rain and wintery mix.
 |
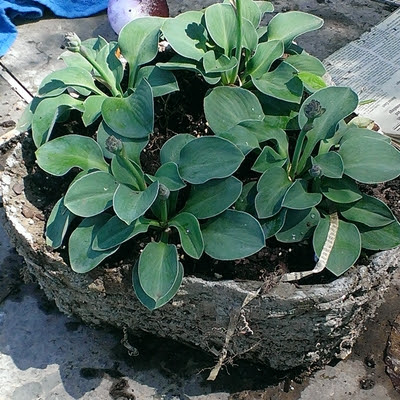
| Blue Mouse Ears in Hypertufa Planter |
Planting your Hypertufa Planter
Hypertufa planters are great for plants. They do not heat up in the sun and they are porous which will allow the plant's roots to breathe.
 |
| Tick Tock Hosta In Hypertufa Planter |
Great Plants for Hypertufa Planters
My favorite plants for Hypertufa planters are hostas! Hostas look great in containers in general, and they're one of the most care-free perennials you can have.
There are many mini and small hostas that are perfect for small Hypertufa planters. Use the shop button below.
Other plants that will happily grow in Hypertufa planters include alpines, succulents, sedum, tiny evergreens, any plant that's at home in a rock or alpine garden.
I hope you've enjoyed learning how to make great Hypertufa planters. There are so many awesome hypertufa projects you can make. You're on your way to becoming a true Hypertufa-holic!
Where to go next!
This post may contain some Amazon Associate links meaning that I will get a small compensation at no expense to you if you purchase something from this blog.


.png)


No comments:
Post a Comment
Note: Only a member of this blog may post a comment.